
Sending a separate payslip for each employee
After finalising the pay period, simply click the ‘Create/Send Payslips’ button within the Payroll function > 'Email payslip PDF for multiple employees'.
1) On the left hand side, select the employees for whom you wish to email payslips. Please note only employees for whom you have email addresses entered will be displayed. Several options for selecting which payslips to email are available by clicking the ‘Select By’ button.
2) To further customise your payslips before emailing, click the ‘Customise’ tab in the middle. This facility allows you to add or remove certain information on the payslip, for example to add an employer address.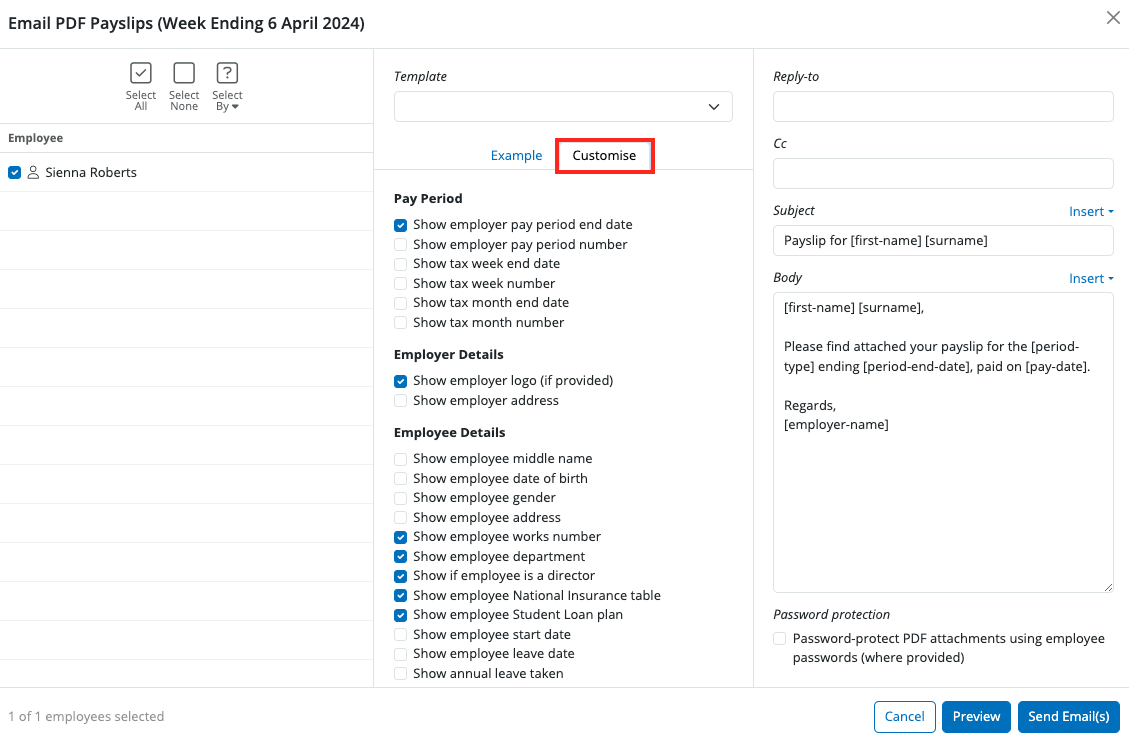
3) On the right hand side, enter a ‘Reply-to’ email address. This is a mandatory field and a valid email address must be entered before the emails can be sent. If required, more than one CC email address can also be entered in the box below.
4) If required, more than one CC email address can also be entered. CC address(es) can now be saved/remembered so users don't have to re-enter them each pay run, simply toggle the option to the right
Note: the 'cc' email addresses chosen will only apply to that one particular employer. It is not possible to set a default CC for emails across all clients / employers without first changing the toggle setting within in each employer data set.
5) Enter a subject of your choice for your emails, either by manually typing this in or by using the smart text options.
6) Enter a description to accompany the payslip if desired, by manually typing this in the box provided or using the smart text facility.
7) If you would like to password protect the payslip, simply tick the box provided. Employee passwords must be entered beforehand within the HR section of their Employee record in order for the payslip to be password protected on receipt. Password protection is recommended if the recipient is not in a secure environment when they receive their payslip and will ensure that the payslip can only be viewed when the password is entered.
8) When ready to email the payslips, simply click ‘Send Emails’.
9) Once emailed, you will see the date and time they were emailed automatically populated under "Last Emailed".
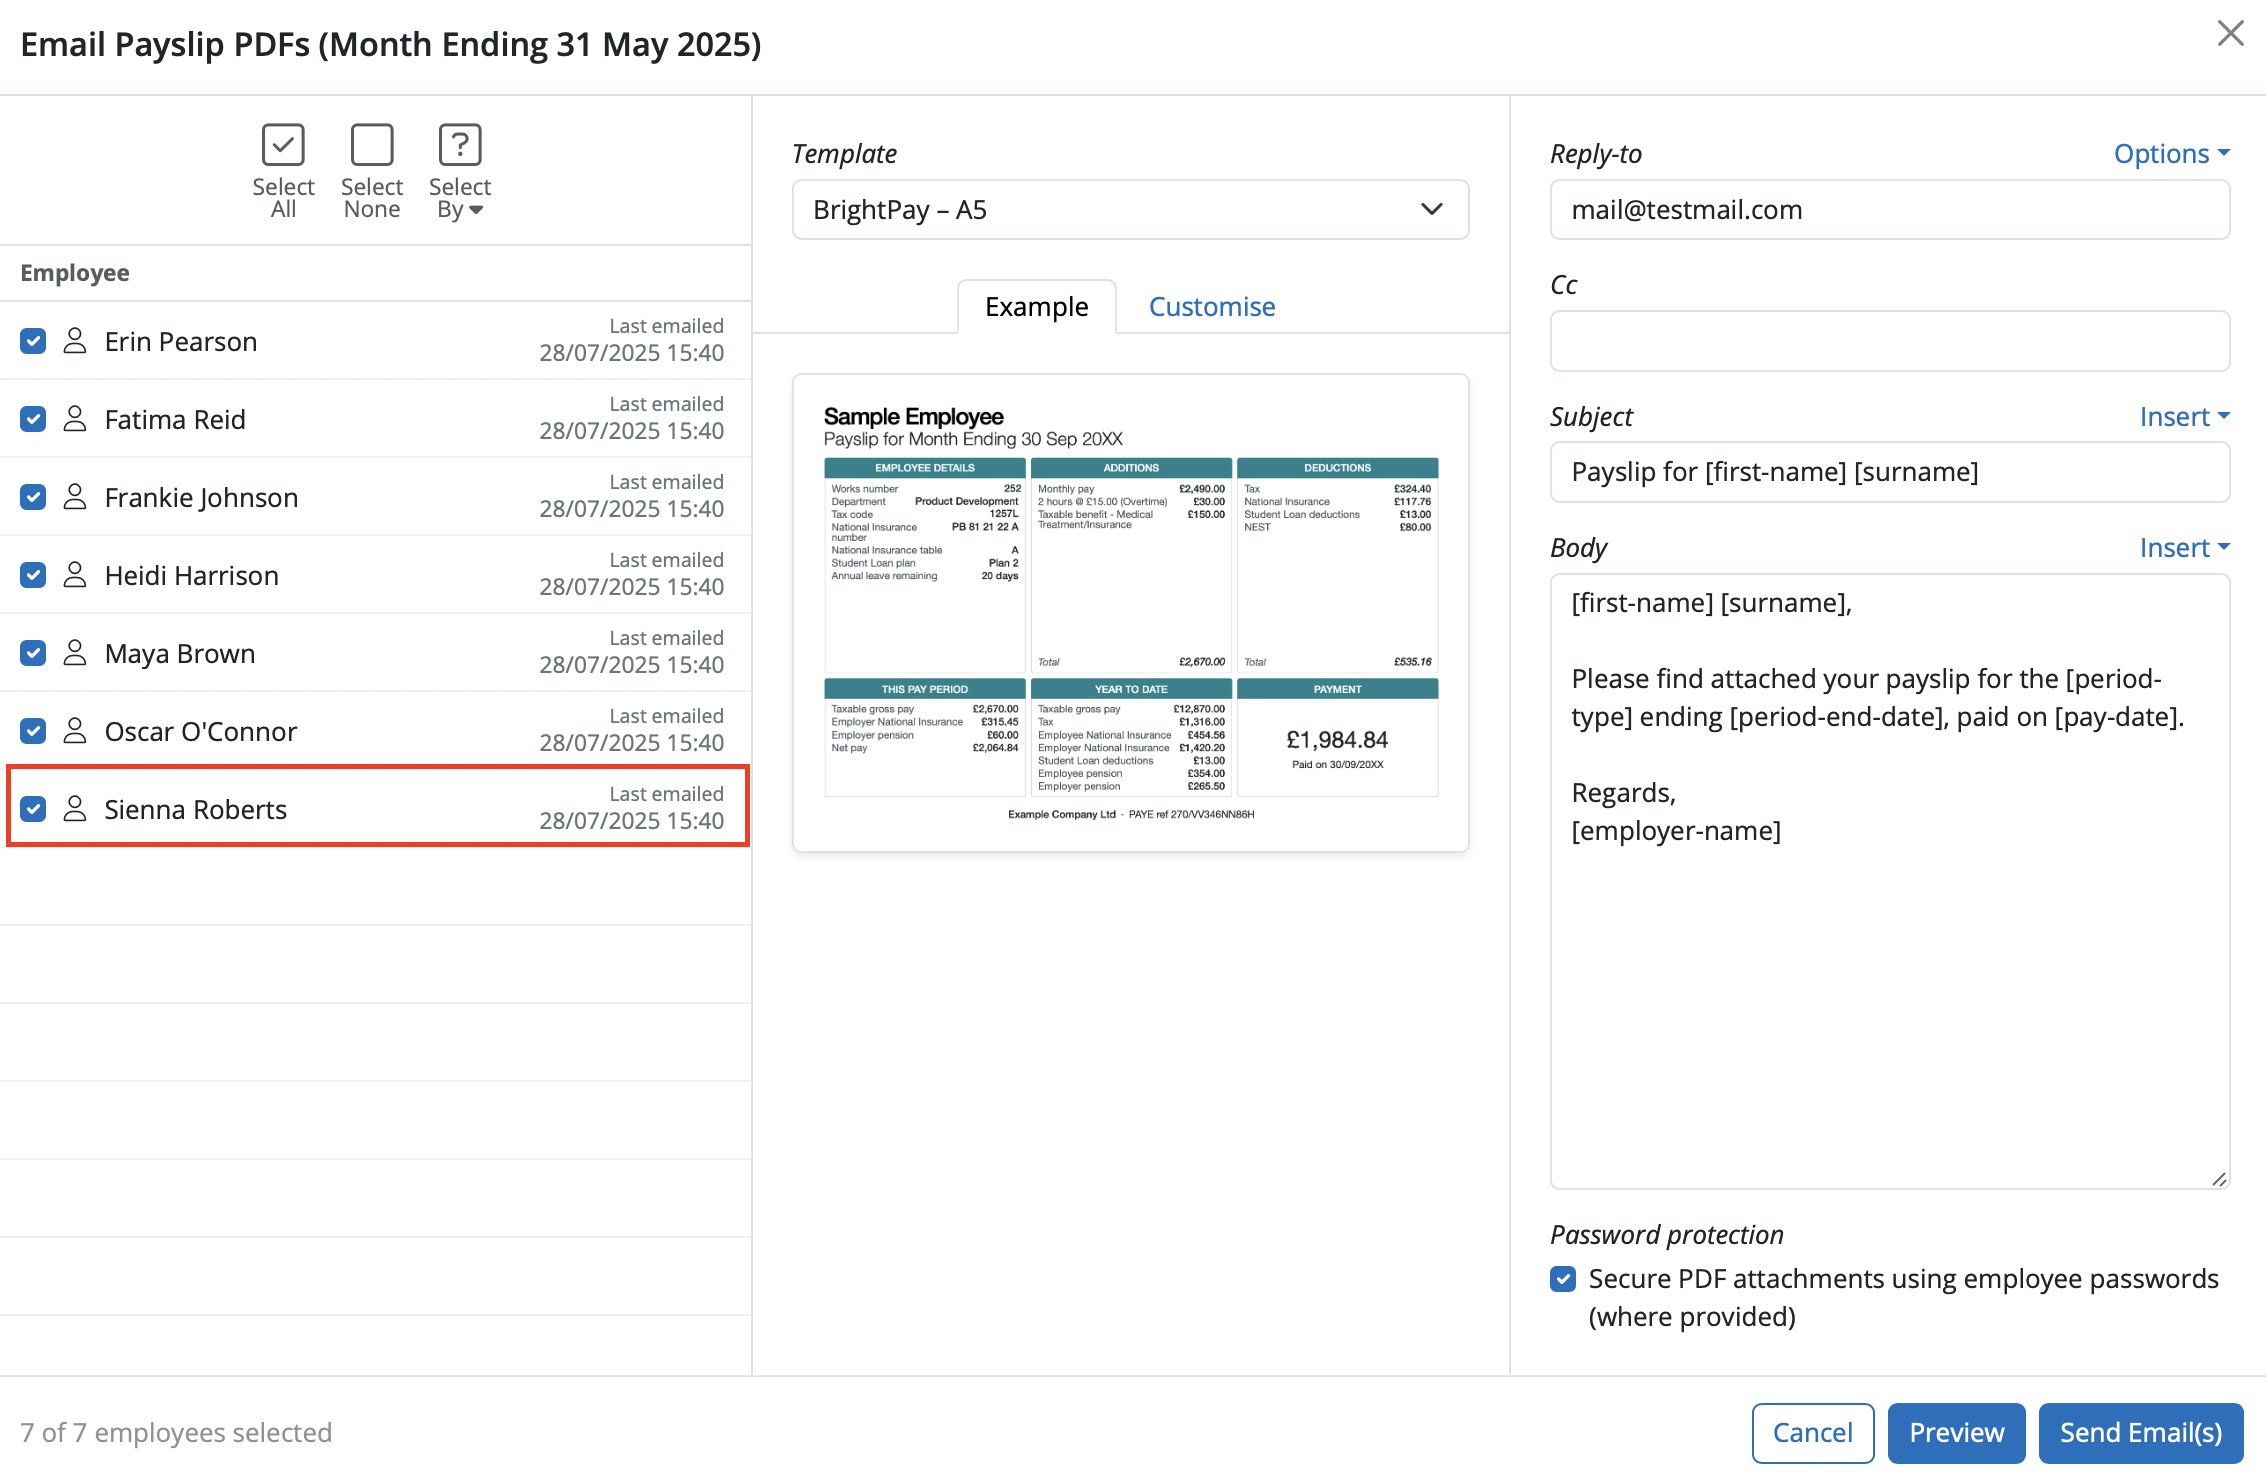
10) Payslips can be emailed again at any time.
To check the date a payslip was emailed for previous periods, select the pay period you wish to view in the Payroll tab > create/send payslips. The time and date stamped will show when the payslip was sent. This can be used for audit purposes if required.
Please note: the 'last emailed' date and time stamp is currently only available for emailed payslips and not for P45 or P60 documents emailed via BrightPay.
To email a single multi-page document containing all payslips selected
After finalising the pay period, simply click the ‘Create/Send Payslips’ button within the Payroll function.
1) On the left hand side, select the employees for whom you wish to email payslips. Please note only employees for whom you have email addresses entered will be displayed. Several options for selecting which payslips to email are available by clicking the ‘Select By’ button.
2) To further customise your payslips before emailing, click the ‘Customise’ tab in the middle. This facility allows you to add or remove certain information on the payslip, for example to add an employer address.
3) Next, select 'Preview' at the bottom of the screen.
4) A preview of the payslips selected will now be displayed. Select Email at the top of this screen to complete the emailing of this document.
Additional Information
BrightPay allows for specific period payments, daily payments, hourly payments, piece payments, additions and deductions to be given a custom description to appear on a printed payslip, if required.
- To set a customised description, before finalising a payslip, click the spanner symbol for the pay item in question, followed by 'show on payslip with custom description':
- Enter the desired description and click 'OK':
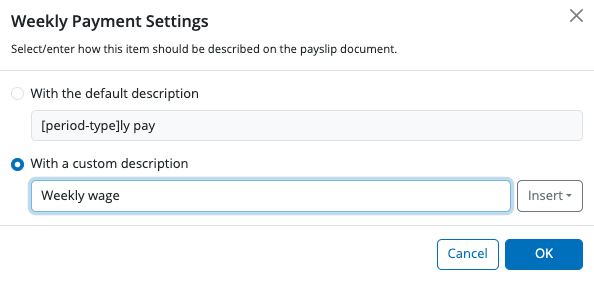
- On finalising the pay period, the employee's printed payslip will now reflect the customised description:
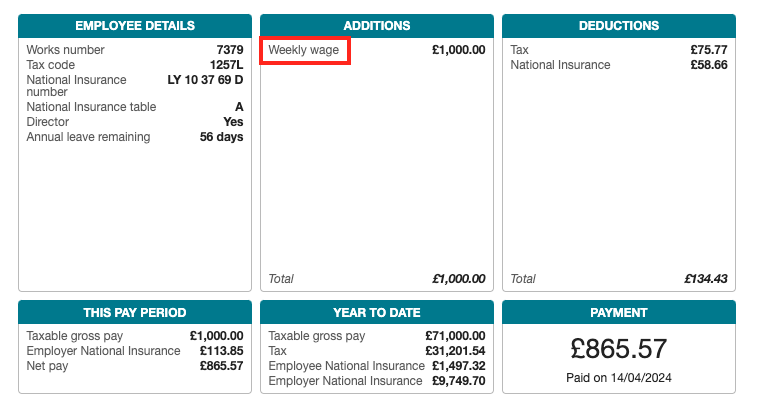
Please note: the customised payslip description will hold going forward until such time the user removes it.
To change the default 'reply-to' email address on BrightPay, go to Settings icon > Email preferences and change the reply-to email address and Save.
Once payslips have been emailed, there is no option to 'retract' or cancel the emails being sent. The software will show you the date and timestamp of when emails were sent via BrightPay, but there is no way to view the email delivery queue.
Important: Any emails sent before this functionality went live will not be backdated. A timestamp will only be shown for emails sent after this time.
This went live in BrightPay on 23 April 2026.
If you wish to communicate a generic letter to employees at the same time as payslips are available, you can use the 'Resources' section in the Employer > Employee Portal to upload a letter here. Make the availability date the same as the payslip availability date and the employee will get a notification on their dashboard when they log in to view their payslip. There is no way to email employees directly from the BrightPay software, you would need to use the Resources section for anything other than payslips or Auto Enrolment letters.
Emails sent via the software will come from our servers and have brightsg.com or brightpay.co.uk domain name / suffix. It is not possible to amend this to show a personal domain such as a microsoft account for example.
Specific Employee Not Receiving Payslips When Sent via Payroll Tab
If one employee is not receiving their payslips, please check the following:
- Check the employee’s email address in BrightPay
Make sure there are no extra spaces or hidden characters in the email address. Copy it from BrightPay, paste it into a plain text editor (e.g. Notepad), and confirm it looks correct before trying again. - Check for company email blocking
If you’re sending to a work (corporate) email address, the company’s IT department may have blocked emails frombrightpay.co.uk. Ask the employee to check with their IT team or email administrator to ensure BrightPay emails are allowed. - Check if the email is on BrightPay’s bounce suppression list
Sometimes an email address can be added to BrightPay’s bounce suppression list if a previous email to that address failed (hard-bounced). If you suspect this, please contact BrightPay Support with the employee’s email address and ask for it to be removed from the suppression list. - Resend the payslip
After the email address has been corrected or removed from the suppression list, go to the Pay Period screen and use Send Payslip to resend the payslip to that employee.
BrightPay uses smart text for employee payslip emails & auto-enrolment pension letters only.
There is no option to add attachments to emails sent via BrightPay. You can email payslips, reports and documents created by the software such as P45, P60 - but there is no option to upload attachments from your device to be included in the email from BrightPay.
FAQs
Q. Can I send payslips using my own Microsoft 365 email account?
A. No. BrightPay does not support direct integration with Microsoft 365 or other third-party email providers. All payslip emails are sent through BrightPay's own email server, and the "From" address will always be a BrightPay email address.
What you can do instead:
Set a Reply-To address - when recipients reply to payslip emails, their responses go to your specified inbox (e.g., your payroll or HR inbox). This allows you to manage replies from your own email account.
Go to: Employer > Email Settings > Reply-To Address
This ensures you receive employee responses directly in your Microsoft 365 inbox, even though the initial payslip was sent from BrightPay's system.
Q. How can I see which emails (e.g. payslip emails) are currently queued?
A. There is no way to view emails are currently queued for delivery in BrightPay. During busier times (ie end of the month) please allow sufficient time for the emails to arrive. If the email(s) have still not been received, please contact the Support team. You cannot view the email queue or cancel an email once it has been sent, there is no retract option.
If you need to have visibility / confirmation that emailed payslips have been received by employees, you can use the 'cc' field when emailing to include your email address so you have a copy of when payslips arrive.
Comments
0 comments
Article is closed for comments.